Is Compost Safe on Veggie Gardens?
Is It Safe To Use Compost On Vegetables?
Here at the NC Composting Council one of the questions that we are often asked is whether compost is safe to use on a vegetable garden. It seems that a lot of incorrect information is out there, giving people the impression that all compost is loaded with germs that could make them sick. It’s true, the issue is complicated, and a pathogen on a leaf of lettuce could make you sick, that is why so much research has been done and so many safety protocols are in place for industrial compost makers. In this article we will discuss some of the basic issues of healthy compost production and the measures that have been taken to ensure that the compost you buy and use is safe.
Let’s start with a general look at industrial composting, a well regulated industry with processes that kill the germs that cause illness while preserving the natural biology that helps plants grow and keeps the soil “alive”. All compost, whether it’s made at home or in an industrial setting, needs to have the right ratio of carbon, nitrogen and water in order for the microbes, fungi, and other microbes to be at their peak performance in breaking down the materials in the pile. Industrial compost manufacturers call these components “feedstocks”. Feedstocks can come from farms (manure, crop residue, animal carcasses), restaurants or school cafeterias (food waste, cardboard, cooking oil & grease, paper goods), municipal yard waste facilities (grass clippings, leaves, wood chips), construction and demolition debris (drywall, lumber, soil), and even treated sewage sludge referred to as “biosolids”. All of these materials can be safely turned into clean healthy compost that can be used on any vegetable garden if composted in the right way.
Hot Composting or Thermal Composting is the most commonly used practice that kills pathogens and makes compost that is safe to use anywhere. The basic process goes like this; a recipe of nitrogen-rich material is mixed with carbon-rich material and moistened with water. Microbes begin eating the feedstocks which creates heat and the temperature rises. In the first phase of hot composting, called mesophilic, temperatures are between 68° – 104°. Bacteria that can do best at lower temperatures are active in this phase; as they increase in numbers and dissolve particles of the feedstocks into their essential nutrients the temperature continues to rise and the pile goes over 104°, entering the Thermophilic phase. Here, temps reach 150° and can go even higher if the pile is not managed correctly.
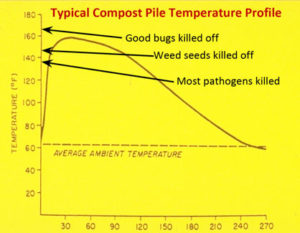
As you can see from the chart above, most pathogens or disease causing bacteria are killed at about 140°. Beneficial bacteria that flourish at lower temperatures can go into a dormant phase and wait out the excessive heat.
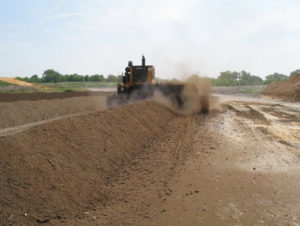
A key to keeping the bacteria happily heating up the pile is oxygen. The introduction of oxygen can be achieved in two ways, one is turning or mixing the pile regularly. To see how this is done on an industrial scale, take a look at this video from Komptec, a maker of industrial composting equipment: https://www.youtube.com/watch?v=lArcaCWg4U8
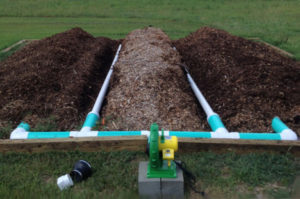
Another method of oxygen introduction is known as Aerated Static Pile (ASP). A network of perforated pipes is laid down and the feedstocks are piled over them. Air is forced through the pipes and flows up through the materials keeping them well oxygenated. This photo shows an ASP demonstration system that was constructed at the Compost Learning Lab and NC State University.
 Time is the final factor in ensuring that compost is safe to use. Once the optimal temperature is achieved in any pile it must be maintained for a specific amount of time; in an aerated static pile the temperature must remain at or above 131° Fahrenheit for at least three days. A windrow pile must achieve the same temperature and stay there for at least 15 days with five turnings of the pile.
How do you know the compost you buy has undergone these practices and is safe to use in your gardens? The composting industry is governed by various state and county regulations that are adapted from the EPA and FDA stated regulations. These regulations are not only for the safety of the person buying and using the compost, they also help protect the environment both down wind, and down stream of the composting site. Strict safety guidelines exist for every aspect of the industrial composting process from what materials can be processed to how water runoff must be handled. In North Carolina, the Department of Environmental Quality is responsible for setting rules and regulations for the large scale production of compost. Different types of permits are required to establish a composting facility based on what feedstocks will be used. Once the facility is built and operating, exacting records must be kept and the site must be inspected periodically for a multitude of health and safety standards.
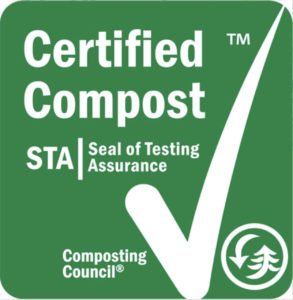
Even with all of these regulations, a level of assurance about the safety of compost use on vegetables gardens was still in question until the year 2000, when the US Composting Council launched its Seal of Testing Assurance Program (STA). Aimed at standardization of quality and transparency the program requires participants to keep stringent records on a multitude of health issues and make those records, along with guidance on how to properly use compost, available to consumers when requested. Commercial composters around the country have enrolled in the program and the STA Certified Compost logo can now be found on bags of compost sold in garden centers. Farmers can also purchase STA certified compost in bulk for their farms.
Look for this seal when purchasing compost, and for further information about the program as well as a list of STA certified compost manufacturers, visit the US Composting Council websites https://www.compostingcouncil.org/page/CertifiedCompostSTA.
Resources:
1. Seal of Testing Assurance
2. TTMEC – Test Methods for the Examination of Composting and Compost
http://www.extsoilcrop.colostate.edu/Soils/powerpoint/compost/T.M.E.C.C.pdf
3. Komptech Americas, https://komptechamericas.com
4. Ohio EPA, Compost quality standards for class I composting facilities
https://www.epa.ohio.gov/Portals/34/document/currentrule/3745-560-130_current.pdf
5. Metropolitan St Louis Sewer District, Specifications for compost application.
6. Grow It Organically, How Hot Composting Works
https://www.grow-it-organically.com/hot-composting.html
7. NC Regulations, Compost Operators Training Course 2018, NC Composting Council, Wilson, Donna; NC Dept of Environmental Quality
8. U.S. Environmental Protection Agency Regulations for Compost Production and Use; Walker, John M.; US EPA, Washington DC, 1996
![]()
